
Project Overview
The purpose of this project is for you to see how the geolocation element of HTML5 works. Geolocation is tied closely with Google's Map software. Google has changed usage of its map application since the writing of this lesson.
You now need to have a application program interface key and you must give them billing information if you plan to use Google Maps on your web page.
You can still complete the lesson without the API key, you just can't put it up on your web site.
The application you will be developing is a Trade Show web application located your geographical area.
A sample project is already provided for you so that you can model your own application after it. The app example is to promote a surfing and watersports trade show.
It was created paying attention to the responsive design models suited for viewing on cell phones, tablets as well as computers.
It includes: places to stay, restaurants in the vicinity, places to surf, an animation of a surfer, and scrolling pictures of things to do when not involved in the trade show.
It also contains a Google map based on lattitude and longitude for the area, where you can make reservations and plan your trip to the trade show
The last part of the project includes the trade show's events an agenda for the two days and a rotating picture gallery of the the area.
It also includes a way for participants to register for the event. The project takes approximately 1 weeks (5 hours) to complete.
As you are going through the assignment, be thinking of what your trade show will be.
You should go thru the existing example to try our all the code for yourself.
Fill out the worksheet ans you go through the lesson. Work sheet for this project
After completing the surfing tradeshow application, create your ownn trade show app using the code you have already used.
Organization of Tutorial
The column at the far left contains the navigational links. Clicking on these links takes you to that particular section of the tutorial.
The middle column contains the actual tutorial instructions. The column at the far right contains the code needed for the project.
Geolocation Trade Show ApplicationPlanning
Even though the project is all ready laid out for you, it would be a good idea to look at the planning stages of this project so that you can apply this knowledge to projects of your own creation.
Flexible box model template
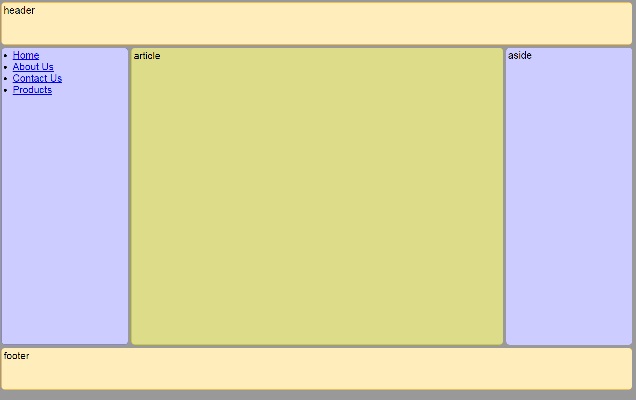
- First, start our with the flexible box model template for the html part of the project. It features flexible boxes for the article or main section, the side box a navigational box as well as a header and a footer.
- The flexible model is designed to work with cascading style sheets files to make your application suited for cell phones and tablets, as well as computers.
- Code for the flexible box model fo the trade show application is in Figure 2 for you to use.
- Here is what goes in each section of the template.
- The header
- In my example, the header contains: Trade Show announcement place and dates.
- A graphic featuring a surfer on a wave that covers the entire header.
- The text, the name and dates of the trade show are indendented
- The footer: copyright information.
- The Article - Main Section of Page.
- Included in this section is a Google map of the area based on lattitude and longitude.
- Navigation Section
- Places to stay plus and image
- Places to eat plus and image
- Animation of a surfer on a wave
- Places in the area to surf
- Aside - Side News
- Schedule for the two days of the trade show
- Rotating images of different places of interest
- Link to the registration page for participants
When you create your own app, decide on a color scheme for the header, footer, article, aside, navigation and borders for each. RGB - red, green blue was used in this example. You can also use hex-decimal numbers to represent the colors or in some case the name of the color.
You can also decide on color for ordered , unordered lists, both background and text colors.
Wikipeia RGB colors
Day 2
Materials, Files and Pictures Needed
You need a number of things before beginning your own project. You will need the following items.
- Names, addresses for restaurants in your area.
- Places of interest
- An agenda for your event
- Figure 1: Current location code
- Figure 2: HTML5 code
- Figure 3: Style file-default
- Figure 4: Style file 6
- Figure 5: Style file 5
- Figure 6: Style file 4
- Figure 7: Style file 3
- Figure 8: Style file 2
- Figure 9: Style file 1
- Figure 10: Code for registration form
Here are the pictures for the trade show app.
Hover over each picture to reveal the name of the picture file. Right click each one and save as name indicated into your working folder.
 |  |  |
 |  |  |
 |  |  |
 |  |  |
 |  |  |
You will need to locate the following pictures for your own app.
- A picture for the header that reflects the kind of trade show you are promoting.
- A picture for the places to stay section.
- A picture for places to eat in your area
- a picture for the animation section. It should again reflect something about the nature of your trade show.
- Eleven pictures for the scrolling section: places of interest.
How to get the picture files for your own app.
- Search the Intenet for appropriate pictures.
- Right-click each picture.
- Save image as
- Select the folder being used to store this project
- Pick a descriptive name for each one.
- .jpg is a good format to save under
- Continue until all pictures have been saved into your folder.
How to get copies of all files needed for the project.
- Click the button below the textarea box containing the code you need.
- All the text is selected and put on the clipboard.
- Open Notepad++.
- Select New File.
- Paste the information from the clipboard into the new file.
- Save the file using the name of the style files listed above each batch of code.
- For example, save the code for the Style1 file as 'Style1.css'. These file are all linked to your main html5 web page.
- Remember case matters.
Day 3
Teacher Responsibilities
The teacher needs to make certain that the students' computers have Notepad++ and Google's Chrome installed as a browser. The other browsers such as Internet Explorer and Mozilla's FireFox will work nicely too.
The teacher needs to verify that certain parts of the project are completed and that the software performs as it was designed.
There is a sign off worksheet that should be completed to come up with the student's grades. Checkoff the required material each day on the worksheet.
Work sheet for this project
Day 4 Getting Your Location
For your project, you will need to find your current position based on longitude and lattitude since your project counts on the fact that your participants in the trade show, want to stay and eat at local places.
Longitude is a geographic coordinate specifying East-West position. The distance of a degree is about 69 miles or 60 nautical miles.
Lattitude is a geographic coordinate specifying North-South position.
The program in figure 1 has the code needed for you to determine your location.
- Click on the button at the bottom of the textarea box. By clicking the button, the code is selected and put on the clipboard.
- Now open up Notepad++
- Click on new file.
- Paste the code into the editor.
- Save your file using an html extension.
- Make sure that you have enabled location on your computer.
- Go to Start
- Settings
- Privacy
- Location
- Turn settings on
- Execute the program by clicking on the button Try it
- Your longitude and lattitude should appear.
- Write down these coordinates, as you will need them for this project.
- The HTML5 code for the project is in Figure 2.
- Click the button below the text to put it on the clipboard.
- Open Notepad++
- Create a new file.
- Paste the information into the editor.
- Save the file in your working folder and use an .html extension.
What does the code mean?
- The first line indicates that this is n HTML5 document
- The second line sets the language to English.
- Between the head tags are calls to style sheet files and javascript code.
- There are 7 style sheet files that determine the screen sizes for the different size devices, cell phone, tablets, llapttops and desktop devices.
- There is a style sheet file for the header of the html document
- There is a style sheet for the sizing of the map.
- There is a javascript file for the rotatating pictures
- Next comes the API key for Google Maps
- The map script file contains the longitude and lattitude coordinates. Here is where you will enter your coordinats.
- The title is next. Here is where search engines look to get information about your web site.
- After the ending head tag, comes to header for your web page.
- The header contains a picture, located in each style file, that spans the whole area and text that show the name of the trade show and the dates.
- The dates are indented 60% based on the instruction give by the div tag, which is located in the individual style sheet files.
- The body tag is next. While the page is being loaded it calls the cycle function that rotates the differnt pictures.
- The Nav is next. It contains a list of places to stay and a picture.
- Also in this section is a list of places to eat and a picture.
- The next few lines play the animation of a surfer and places in our area to surf.
- The Article section holds the Google map of the area.
- The Aside section contains a schedule for the trade show a scrolling banner with pictures of places of interest and other things to see.
- There is also a link to the registration form.
- The footer is the last part of the page.
Before running the html application, we need to get the style sheets that format the web page for different devices.
The files that accomplish this are:
- default.css
- Style1.css
- Style2.css
- Style3.css
- Style4.css
- Style5.css
- Style6.css
Day 7 Animated Picture
To create an animation insert the name of the picture as the background-image, background-image: url('wave.jpg');.
You can change the size of the animation by adjusting the height and width.
Borders and the color of the border can be modified.
Play with the other numbers to get different effects.
The code is located in the main HTML file.
Day 8 Rotation PicturesThe banner currently cycles pictures of Santa Barbara points of interest.
Follow these steps to use your own pictures.
- First load the HTML file into Notepad ++.
- Examine the code. There a total of 11 pictures in the array.
- They are numbered 0 through 10.
- Change the names of the picture files to your own.
As of June 22, 2014, Google requires an Application Program Interface (API) key to use its map program on your website. You first need to have a Google account and then sign up for the key.
Google also requires billing information, since after a point they will charge you.
To get the API key, click on this link. Google Developers web page
Even without the key, you can still see how the program works and complete your assignment.
When you run it using Notepad++ the center section, Article, displays the map briefly. and then an error message saying 'oops something went wrong. See the javaScript console'
There are three sections of code, all in the HTML section, that need to be changed:
- The style section setting the size of the map. It needs no changes, but you can change the size if you want.
- The script section that loads and uses Google maps. If you get a key, you need to put that API key in the appropriate line.
- The third section is within script tags and it is where you will enter your longitude and lattitude coordinates.
After making the changes, save the file.
Day 10 Testing the application
Using Notepad++ run the program. It should look like the following image.

Day 11 Registration Section

The application also contains a registration form for attendees. There is link on the trade show app to the registration form. After the form has been filled in, the submit button is clicked, the form is sent to the web host and tied to the web page and an email account.
If you fill out the form and submit it, it will go to my email account.
For the infomation on the form to go to you, you need to arrange with your web hosting company to have them set up form processing.
We can examine the code
It is an HTML form.
After the regular html, language, head and header and body tags, a form name is assigned with the action attribute equal to our website .
The code is in the cgi/form mail folder.
Common gateway interface as used here is (a script standard for writing interactive programs generated by visitors to web pages).
A section called customer info is created and all the code is between those tags.
The legend is the title of the form.
There are fields for first name, last name, email, address, city state and zip.
All fields are required and have placeholders.
After the information fields, a button is created.
input type=hidden value=jerry@janetbelch.com name = recipient
This line is necessary to correctly process the form.Here is the information that you will receive after clicking the submit button.

Trade Show Application key
Registration Form Key
Day 12 Your Turn
Now take what you have learned and create your own app for a tradeshow of your own choosing.